
A lot of authors don’t like making graphics for social media, but we need them! How else are you going to promote your latest book announcement, cover reveal or author event? Then there are the logos, newsletters, social media headers. Oh yeah, and that’s not even considering Instagram.
Thankfully, I love making graphics. What better way to put off writing actual words? But seriously, as much as I love playing with graphic design, I don’t have a lot of time. Graphics may help our social media feeds to look oh-so gorgeous, but are we seeing any return on investment? Put it this way: Would you be making more money if you quit worrying about graphics and just wrote another book? Well, yeah. Almost definitely. But we still do it, because we all want to cultivate that shiny author brand.
So how can you make sexy graphics without wasting too much time? Today I’m outlining some of my favorite free (or almost free) tools to make graphic design for authors fun and easy! And stick around as I walk you through the process of creating a free, flat 3D cover mockup using Covervault and Photopea.
1. Canva
Now old me, the one who spent hours hunkered over an ancient iMac designing my high school yearbook in PageMaker, didn’t mind a little complication. She was used to spending hours and hours getting a design just right. New me, not so much. Enter Canva. They make design easy for just about anyone, including a drag-and-drop interface, a built-in library of stock images (with their paid version, currently $12.95/mo) and an endless array of templates (if you feel inclined to use them).
Even better? You no longer have to worry about your image not fitting on the zillions of various platforms. They have templates specifically for Instagram, Twitter, Facebook, YouTube, Stories. The list goes on. You can make short videos, full presentations, logos, printable postcards. And they have a “Resize” feature that allows you to create an image using one template, say for Instagram, then copy it onto templates for other platforms. Now, to be fair, you will have to do some editing. Just because you resize an Instagram graphic for Twitter, does not mean it’s going to look right. Still, I’ve personally found that the feature saves me tons of work, and Canva is regularly adding snazzy new features to beef up their offerings. And no, they’re not paying me to say this. If only.
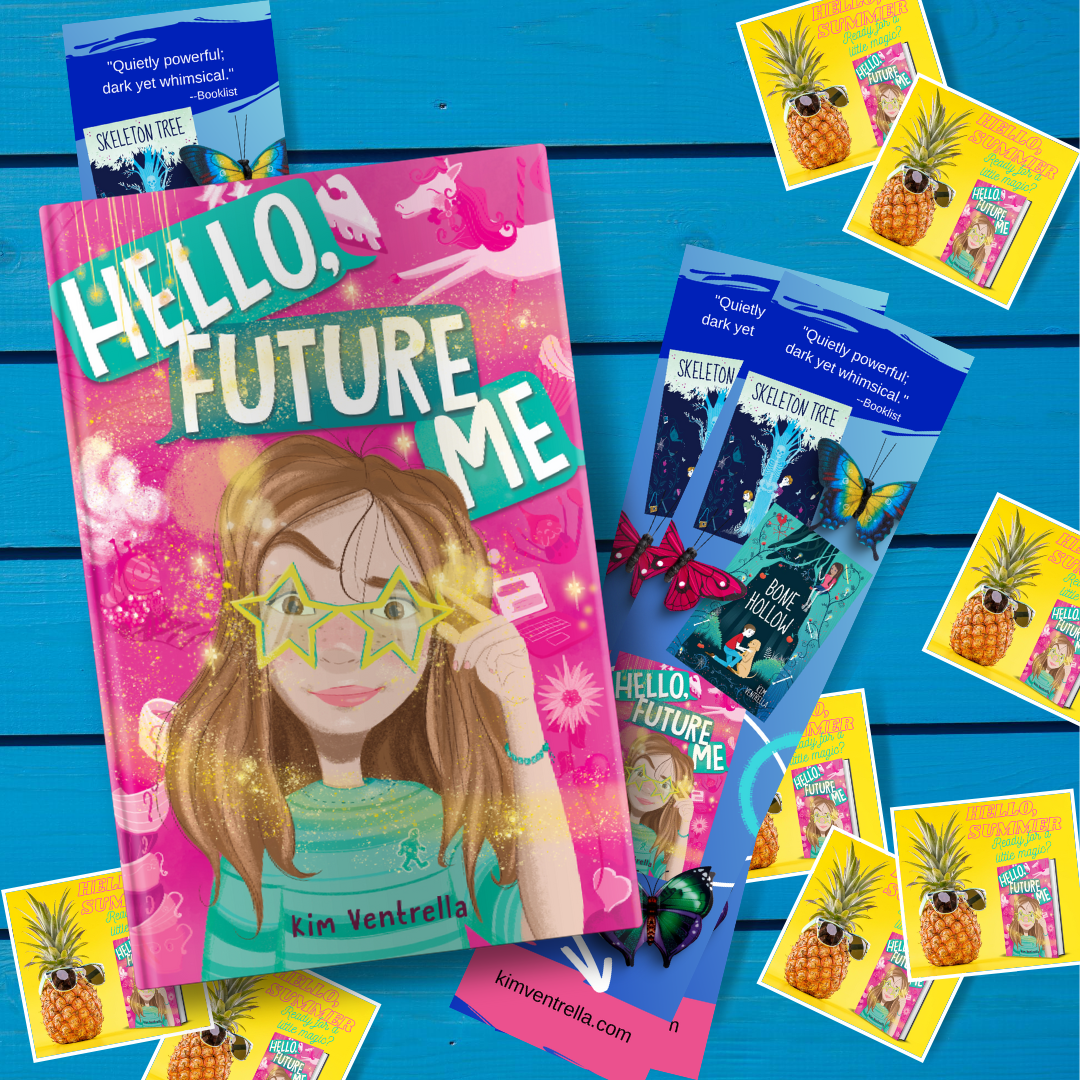
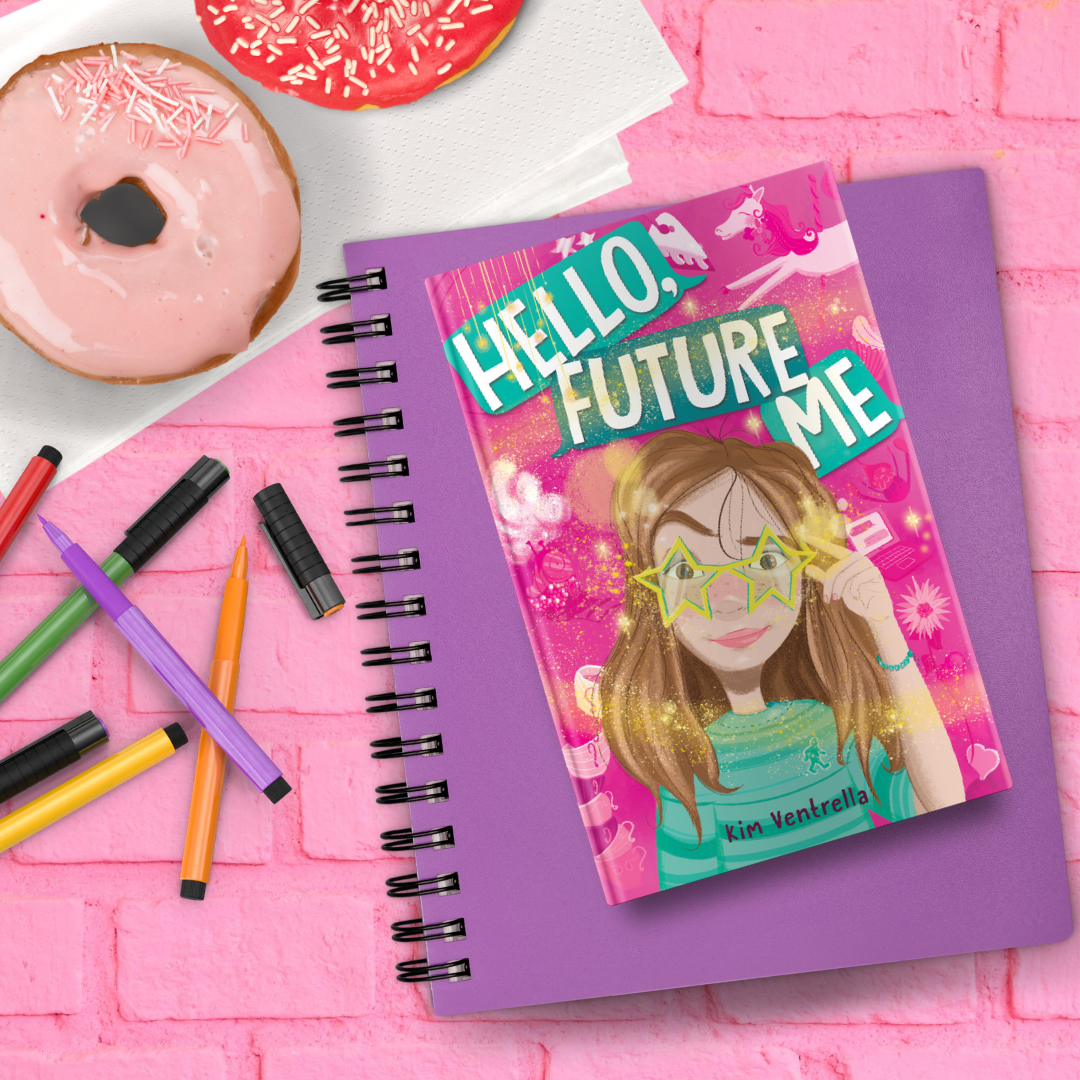
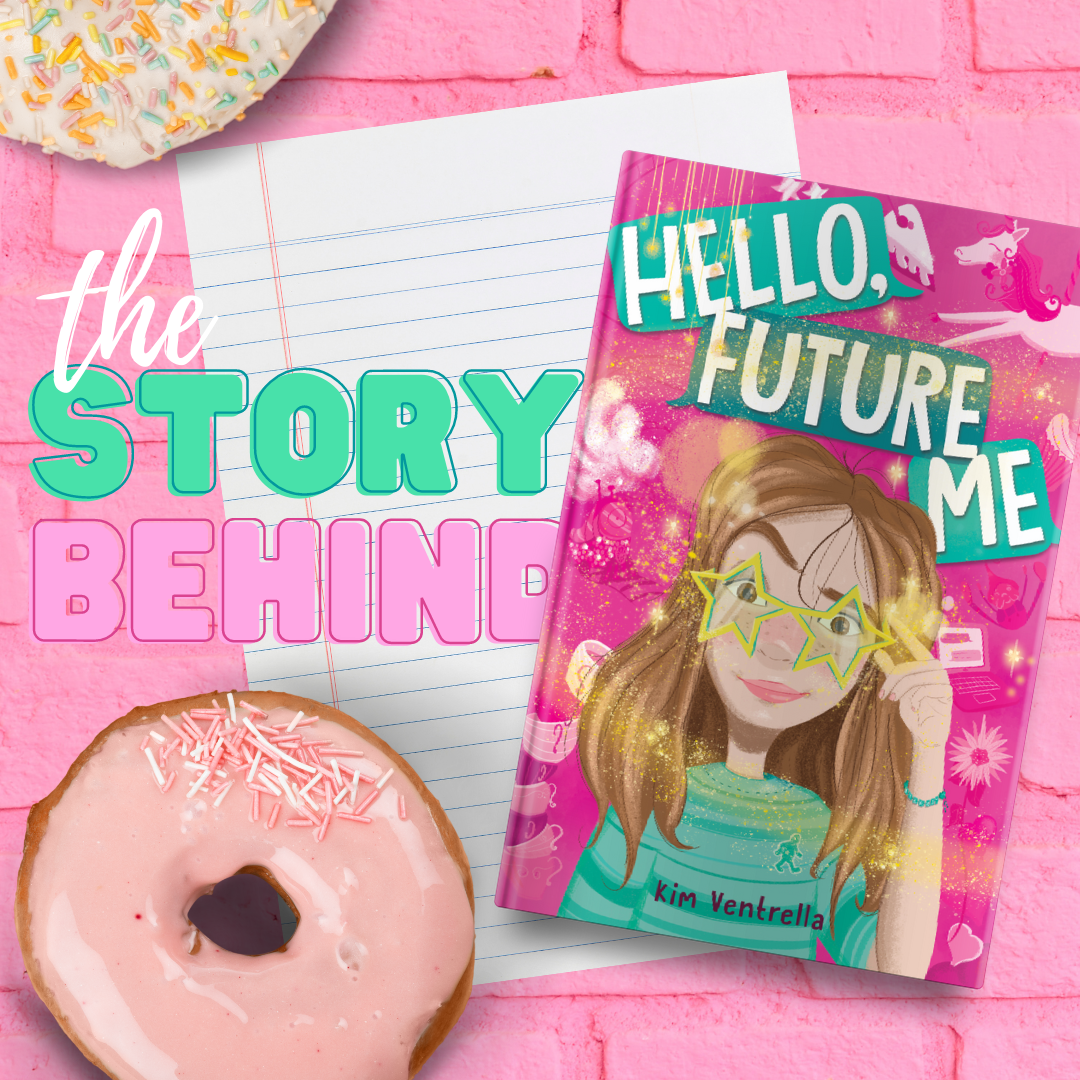
To give you an idea of what you can do, here are some designs I made using Canva, optimized for various social media platforms. This isn’t a full tutorial on Canva. I’ll be diving into that in later posts and on my new Patreon. Now you might be asking, okay, but how do you get those cute 3D cover mock-ups featured in all of your example graphics? Well, let’s move on to our next tool!


2. DIY Book Covers
This is the simplest website I’ve found for creating standing 3D cover mockups, or mockups for e-readers and mobile. What is a 3D cover mockup? Notice how all the covers in the designs above look like real books, not flat images? Those are 3D mockups. They have a transparent background, so you can add them into your graphics and layer things above or beneath them.
So how does the 3D Book Cover Creator work? It’s so easy! First, pick your desired format. You can do a single book or a combo.


Click next to upload your cover image. Once you’ve done that, click next again and, presto! You have a 3D mockup to use in promotional graphics. Yup, it’s that easy.
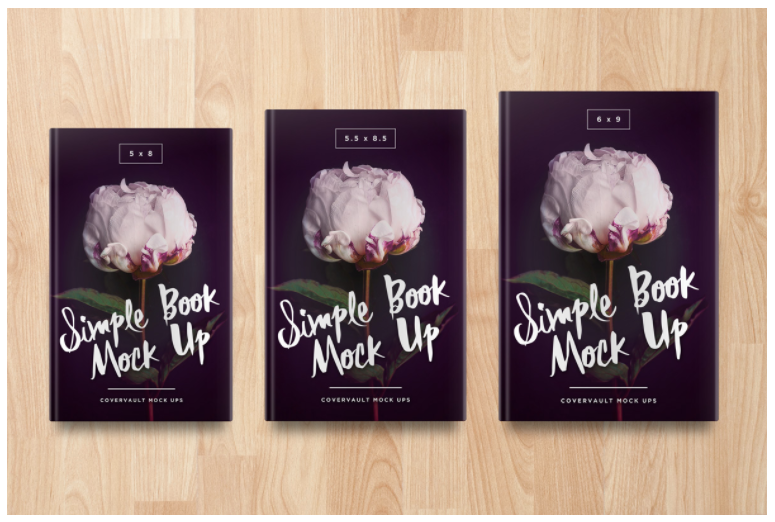
3. Covervault
Covervault is a collection of free .psd cover mockups. In my sample graphics, you may have noticed that I use both flat and standing 3D covers. So how can you generate those flat, realistic-looking 3D covers for free, using the least amount of your time? My current go-to solution is a combo of Covervault and Photopea. We’ll get to Photopea later, but let’s start with Covervault.
It’s an amazing, free resource on its own. The creator has designed mockups for dozens of cover sizes, most featuring backgrounds that you can use as-is. To add your cover art, you download the free .psd files (Photoshop extension) and use Photoshop (or maybe a comparable free resource, i.e. Photopea) to replace the stock covers with your own.
For those totally unfamiliar with manipulating .psd files, it can sound complicated. And it is a lot more intensive than using something like DIY Book Covers, but the results are gorgeous. I actually use Covervault to get the flat 3D mockups seen in my example images above. I open my Covervault file in Photopea, delete the background and make it transparent, then add my own cover art. I’ll discuss all that in more depth below.
Get ready. This next section is a bit intense.
4. Photopea
Photopea is essentially a free, web-based version of Photoshop. How is that possible, you ask? I don’t know, but I’m loving it! And you don’t have to learn all the ins and outs of Photopea to make a simple 3D cover mockup. Here are the basic steps for modifying Covervault templates in Photopea. For this example, I’m using the Covervault template found here: https://covervault.com/multiple-size-hardcover-books-psd-mockup/.
1. Download the template from Covervault. It will come in a zipped folder, so you’ll want to unzip it.
2. Open the .psd file in Photopea.
3. Choose the size that best fits your cover and delete the others. To delete, select the layer representing the cover you don’t want and choose delete.
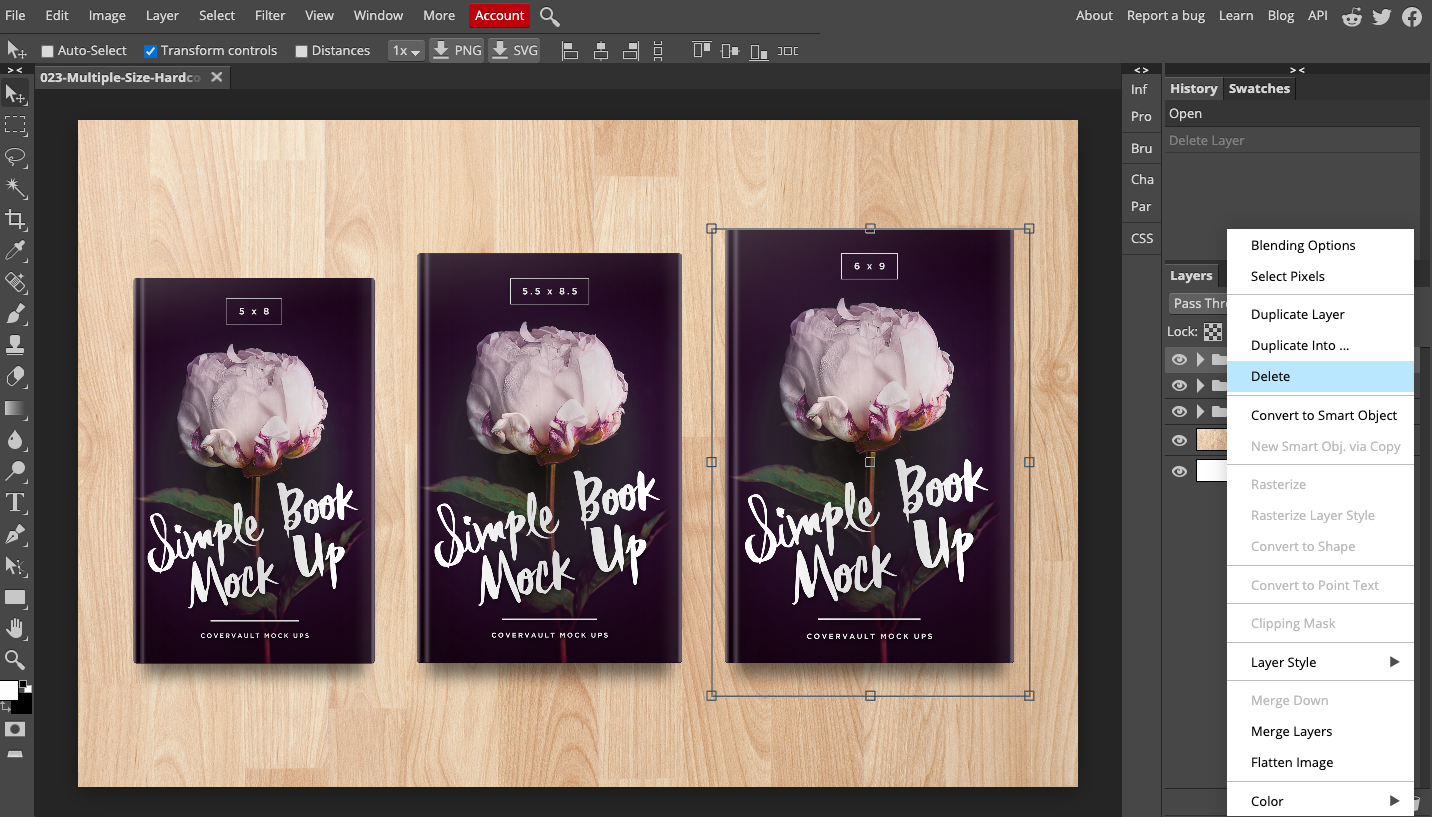
4. Delete the background if you want to create a transparent cover image that you can use for making a variety of promotional graphics. To do this, select and delete the layer named “Wood Floor.” Now select the “Background” layer and drag the opacity to 0.
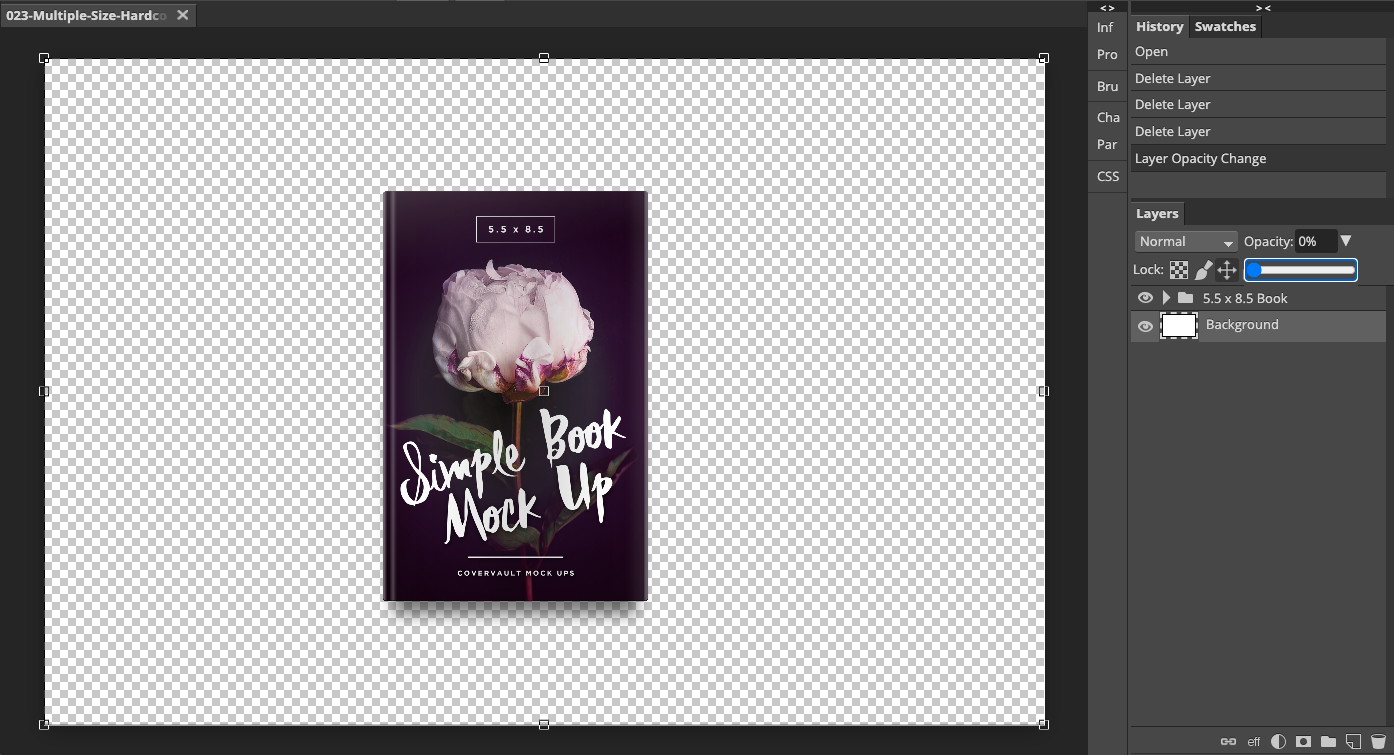
5. Crop the image so don’t have such a huge background. To do this, select the crop tool on the left. Drag a box around the portion you want to keep. Make sure not to cut off the shadow at the bottom. Next, check the box labeled “Delete Cropped Pixels” and hit the checkmark. You will be left with something like this. When you insert this image later into your own promotional graphics, the gray squares will be transparent.

6. Now it’s time to change out the stock cover with your cover. In Photopea, navigate to File and Open. Find your cover image and open it.
7. Next, go back to the tab with your Covervault template. You’ll see a layer for the cover size you’ve chosen. For me, it’s the 5.5 x 8.5 cover. Click the arrow on the layer to expand it. Find the Smart Object. This looks like a mini version of the sample cover linked to a blank rectangle. Double click the Smart Object to open it in a new tab.
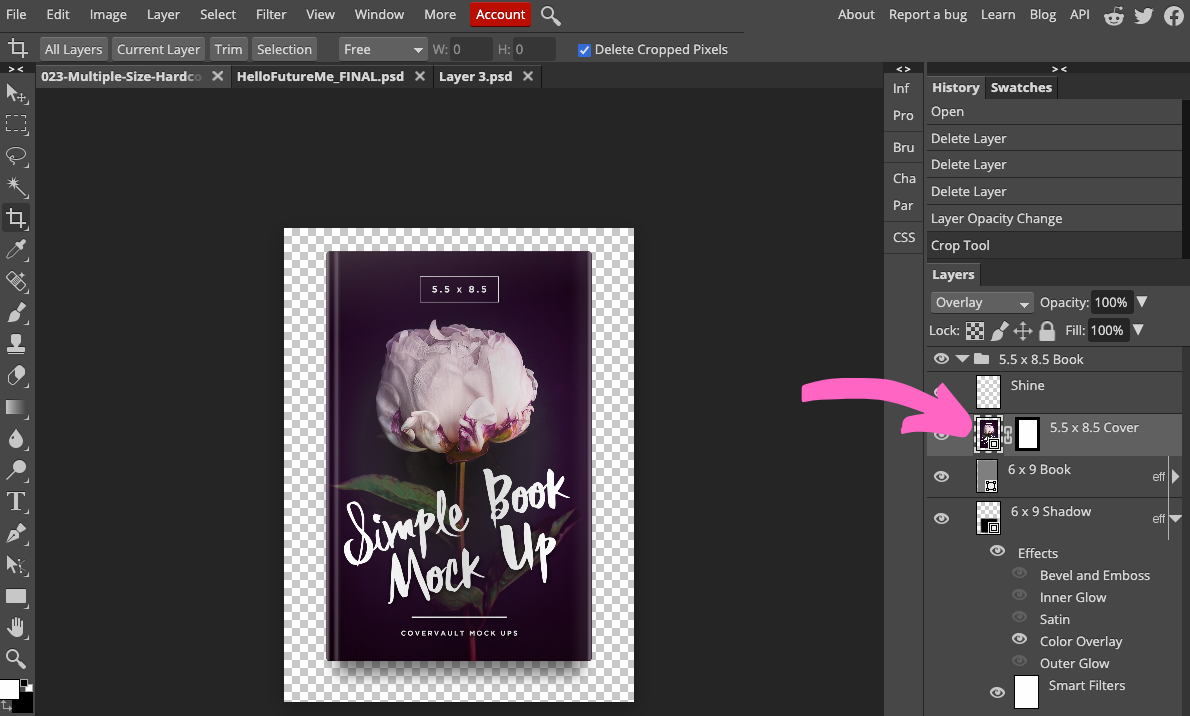
8. This should have opened a new tab. For me, it’s called “Layer 3.” Next step is to navigate back to the tab with your cover. On the top navigation bar, click “Select” then “Select All.” Next, go to “Edit” and then “Copy.” Yes, you have to manually click to select and copy stuff in this scenario. If you try using keyboard shortcuts, the process won’t work.

9. Click back on the Smart Object tab. Go to “Edit” then “Paste.” Your cover will be pasted on top of the stock image. You can delete the stock image at this point or just click the eyeball next to it in the Layers tab to turn off visibility. Now drag your image until it fits the space. Don’t leave any of the gray squares in the background showing. Hold down shift while dragging from the corners if you want to maintain the aspect ratio (i.e. not stretch out the image).
10. Now it’s time to make your cover image replace the Smart Object on the main document. To do this, head up to “File” and then “Save (Smart Object).” When you navigate back to your main tab in Photopea, you’ll see the change. Phew, you’re finally done!
11. All you have to do now is save. Go to “File” and “Export as PNG.”
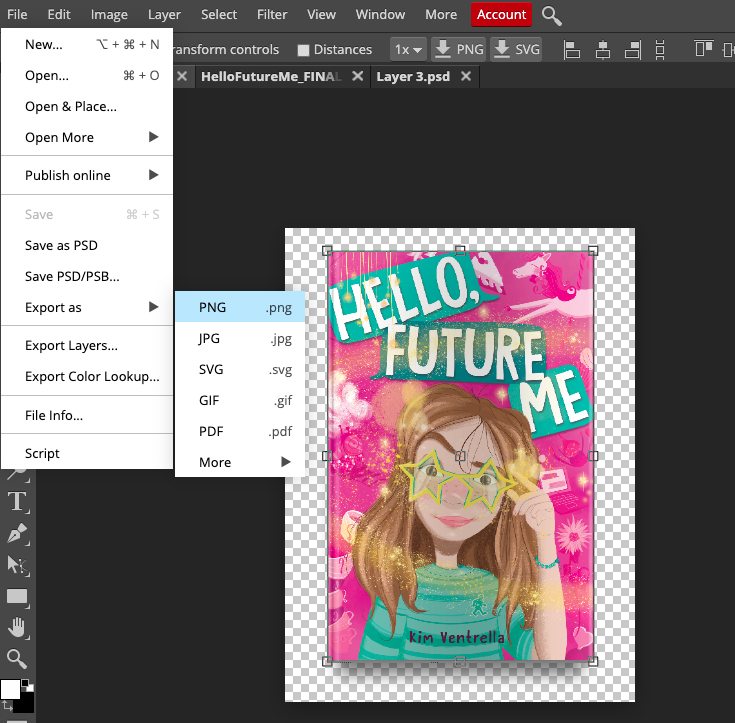
Congratulations! You did it!
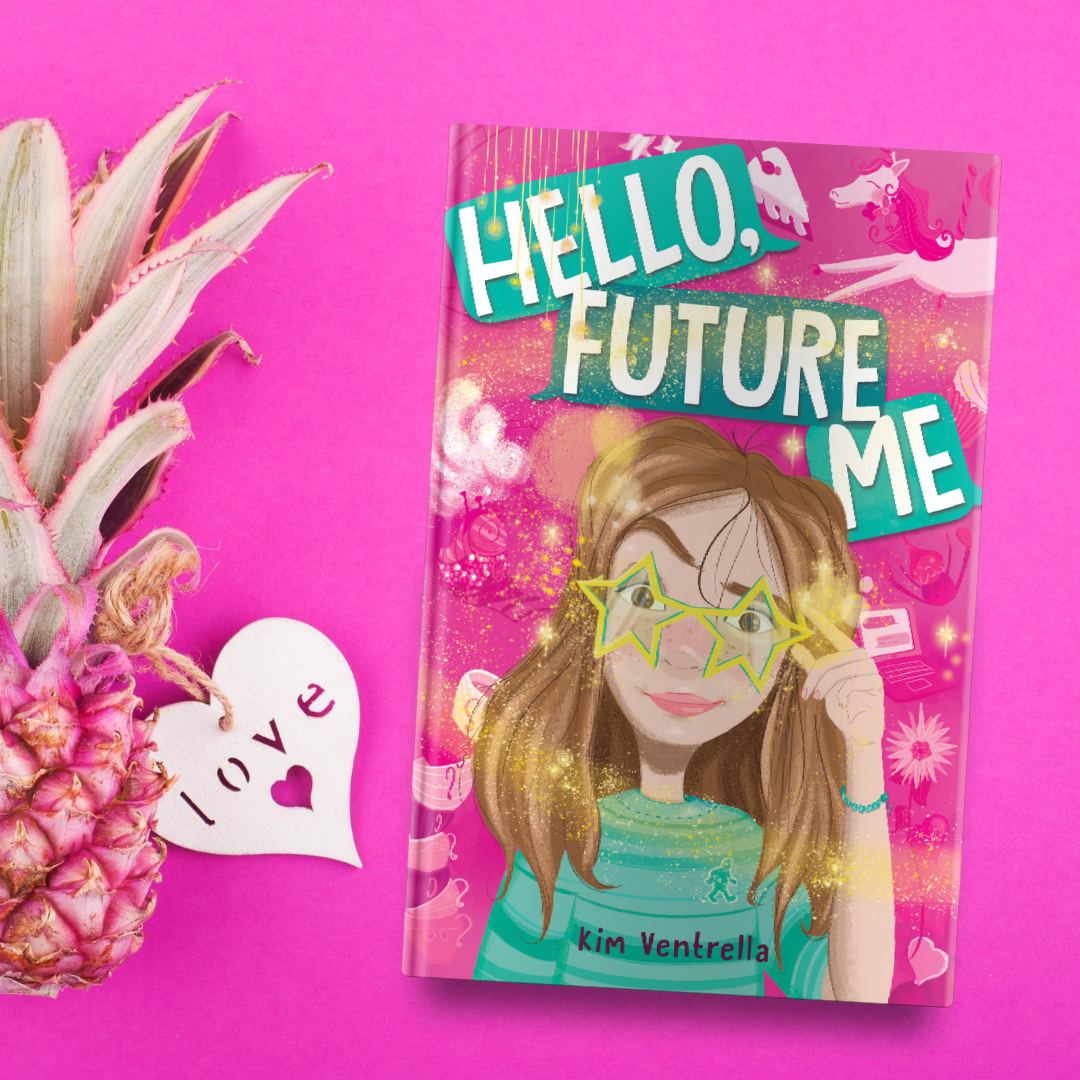
Now you can head back to Canva to create amazing designs using your new flat 3D cover mockup. Oh, and did I mention that you made it for FREE?!! Here are more designs I made in Canva using the cover mockup from our example.


Did you enjoy this article?

Want more help with author graphics?
If you’d like help creating beautiful author graphics, I have a Patreon for that! Subscribers to my “Author Graphics” tier will receive one free design per month (designed by me) to promote your books and author brand, optimized for Instagram, Twitter and Stories. That’s like receiving three graphics for the price of one! Maybe you want to promote a cover reveal, a special event or simply receive a beautiful image featuring your cover. It’s all possible. In addition, all members gain access to my complete content library, including video tutorials and more! New content added every month. Visit my Patreon for details.

About Me
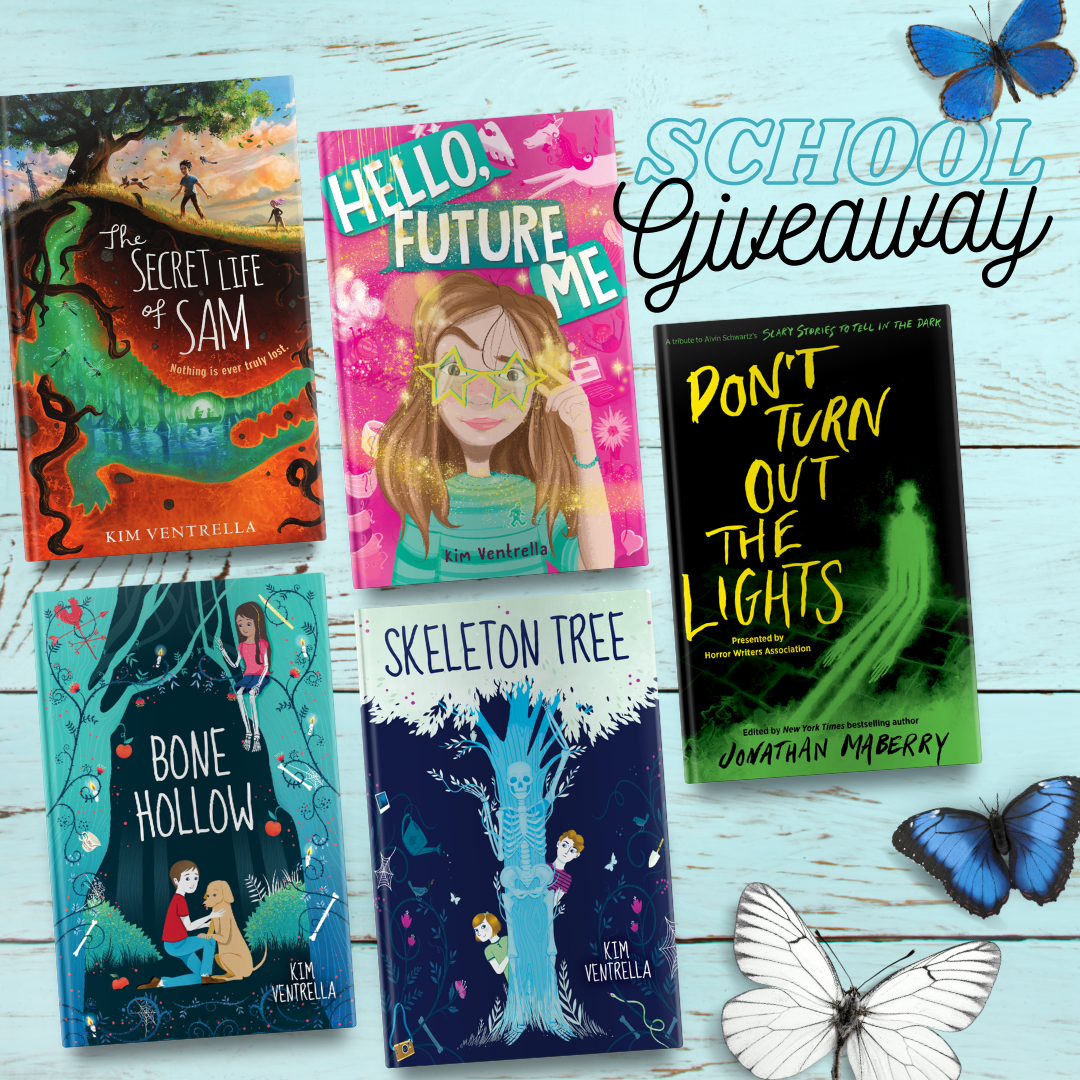
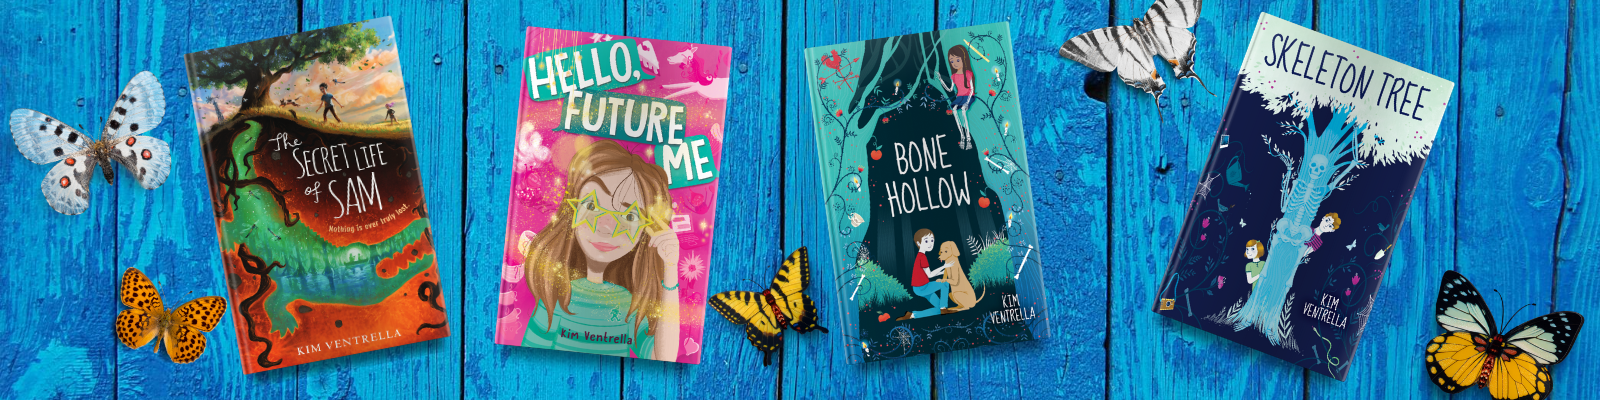
KIM VENTRELLA is the author of The Secret Life of Sam (HarperCollins), Hello, Future Me, Bone Hollow and Skeleton Tree (Scholastic). Her works explore difficult topics with big doses of humor, whimsy and hope. Her most recent middle grade novel, The Secret Life of Sam, was named one of Kirkus Reviews’ Best Books of 2020. Bone Hollow was chosen as a Best Book for Kids 2019 by New York Public Library, and Skeleton Tree was nominated for the 2019 Carnegie Medal in the UK. For the latest updates, follow Kim on Twitter and Instagram.
